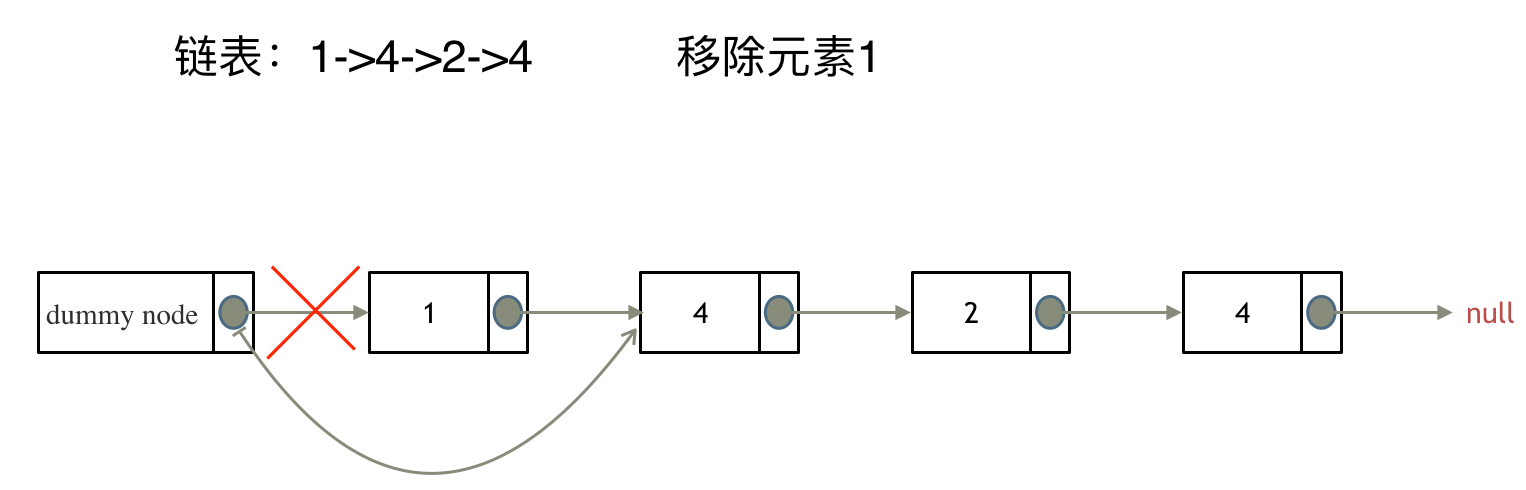
# Definition for singly-linked list. # class ListNode: # def __init__(self, val=0, next=None): # self.val = val # self.next = next classSolution: defremoveElements(self, head: Optional[ListNode], val: int) -> Optional[ListNode]: if head isNone: return head index = head while index.nextisnotNone: if val == index.next.val: index.next = index.next.next else: index = index.next if head.val == val: head = head.next return head
# Definition for singly-linked list. # class ListNode: # def __init__(self, val=0, next=None): # self.val = val # self.next = next classSolution: defreverseList(self, head: Optional[ListNode]) -> Optional[ListNode]: current = head pre = None while current isnotNone: temp = current.next current.next = pre pre = current current = temp return pre
defaddAtIndex(self, index: int, val: int) -> None: if index > self.L or index < 0: return -1 if index ==0 : return self.addAtHead(val) current = self.__getIndexPreNode(self.head, index) newNode = ListNode(val, current.next) current.next = newNode self.L += 1 # self.__printList(self.head)
defdeleteAtIndex(self, index: int) -> None: if index >= self.L or index < 0: return if index == 0: self.head = self.head.next self.L -= 1 return current = self.__getIndexPreNode(self.head, index) current.next = current.next.next self.L -= 1 # self.__printList(self.head)
# Your MyLinkedList object will be instantiated and called as such: # obj = MyLinkedList() # param_1 = obj.get(index) # obj.addAtHead(val) # obj.addAtTail(val) # obj.addAtIndex(index,val) # obj.deleteAtIndex(index)
classListNode: def__init__(self,val = 0, next = None): self.val = val self.next = next import inspect classMyLinkedList: def__init__(self): self.head = ListNode() self.L = 0
def__getIndexNode(self, node, index): current = node for _ inrange(index): current = current.next return current
defget(self, index: int) -> int: if index >= self.L or index < 0: return -1 # 注意,这里传入head.next而不是head current = self.__getIndexNode(self.head.next, index) return current.val
# Your MyLinkedList object will be instantiated and called as such: # obj = MyLinkedList() # param_1 = obj.get(index) # obj.addAtHead(val) # obj.addAtTail(val) # obj.addAtIndex(index,val) # obj.deleteAtIndex(index)